
The Unofficial Beginner's Guide to Home Barbecue, From One Hobbyist To All Others
The Unofficial Beginner's Guide to Home Barbecue, From One Hobbyist To All Others
You don't need to be a seasoned pitmaster to make good 'cue. Just follow three basic commonsense steps, and you will be well on your way.

Once upon a time, I thought barbecue was the act of grilling burgers and hot dogs, maybe some chicken breast, on a backyard propane or charcoal rig. As a child living in Philadelphia, there were no pitmasters around to give me the ol’ what-for about the difference between a cookout and a barbecue. Once I learned the difference, I then got the impression that barbecue was something that was confined to the people on tournaments on Food Network or at restaurants. Usually, the Venn diagram of these two groups has incredibly large overlap. When I thought of smoking meats, I imagined big units with capacity to fit several bulky cuts of meat meant to serve crowds of people. It didn’t feel like something you did at home. Even with the advent of social media, Twitter for me especially, and the realization that a bunch of people were foraying into hobby barbecue with smaller smoker apparatuses like the Big Green Egg or even rigs for their normal cookout grills to allow for indirect cooking, it wasn’t real to me.
Then, I saw that I could procure a personal smoker through my company’s safety incentive program, and my world changed.
It really feels like the 21st Century has allowed any old joe to smoke their favorite cuts of meat and style themselves a barbecue master, even if hobbyists made the backbone of this kind of cuisine in locales such as North Carolina, Memphis, Kansas City, and the great state of Texas. Information spreads, and it’s generally for the better, especially in the case of culinary arts. So when I saw the lil’ Masterbilt Electric Smoker on the catalog, I figured there was no better time to do my own spreading. I wouldn’t call myself an expert in the least. I’m still very much a hobbyist in that I use it maybe four or five times a year. However, the results I’ve gotten have lent me to some universal truths that I think people can use if they, like me, are going to start dabbling in smoking meats. I am going to share them with you here. Now again, I reiterate that I am not an expert. You don’t subscribe to the Smoked Meats Newsletter; you subscribe to The Mental Health Break. You get someone who’s a jack of all trades and a master of maybe not none but not nearly as many as what is covered here on three times a week. I will not give you my advice on how to win a barbecue competition (those things are RUTHLESS by the by), but I will give you what I know on how to smoke a delicious and moist piece of meat.
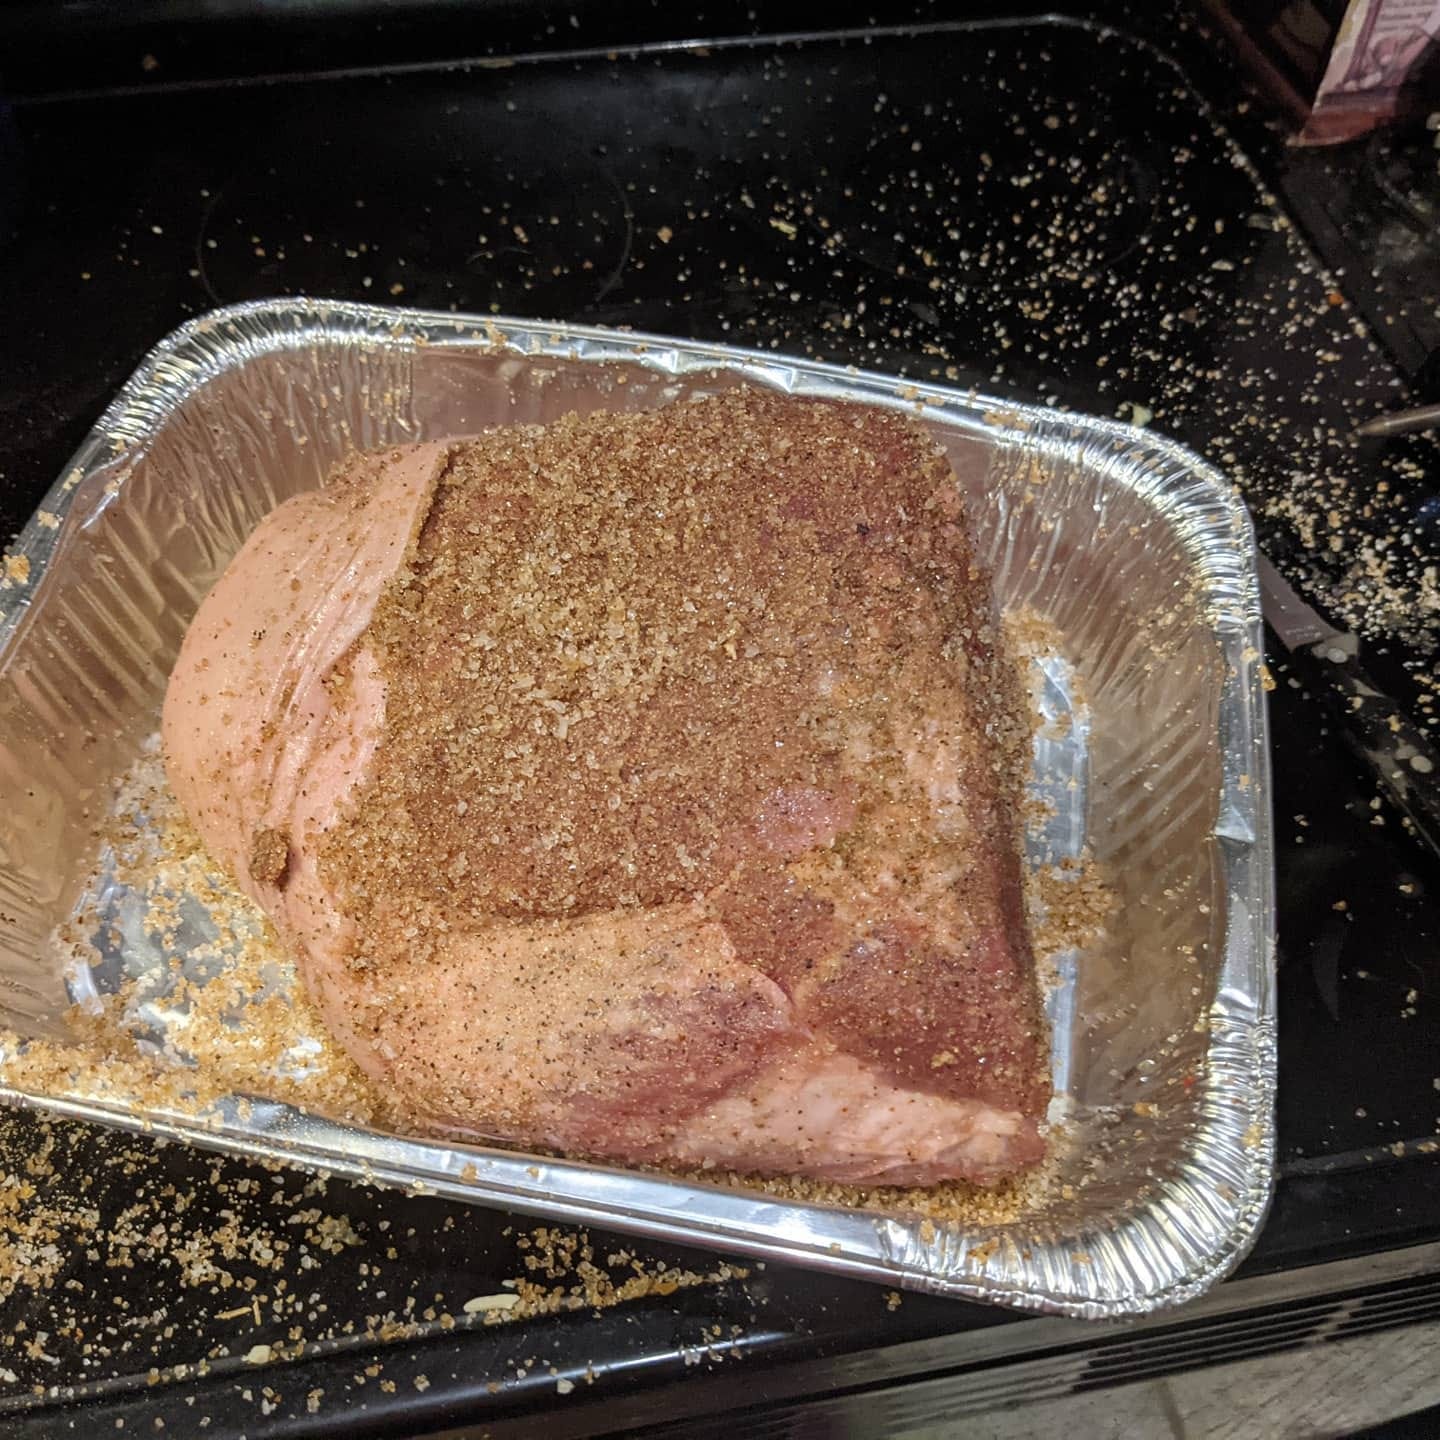
First, season the meat liberally and the day before you cook it. Meat generally doesn’t have a lot of inherent flavor as you and I might know it. Of course, any good cook, recreational or professional, knows seasoning is a key to a tasty dish, but there’s a difference between seasoning a pork chop and a five-to-ten-pound hunk of pork shoulder. You can only apply seasoning to the surface of a solid piece of meat (which is why grinding meat is so popular), and the way you get flavor enhancement through the entire cut is through marination. For a smoked piece of meat, the marinade is generally dry in the form of a rub, a mixture of spices that includes salt, pepper, and any other of the wide mélange of seasonings that can be found in kitchens throughout the world. Some pitmasters used wet brine, but the key is to get those seasoning molecules on top of the flesh and to leave it there for a good long time.
The chemical processes associated with seasoning are called diffusion if dry and osmosis if aqueous. Either way, the seasonings will want to cross the membrane, and yes, the skin of your piece of meat is a membrane for all intents and purposes, to get to a place where the concentration of that seasoning is less than where it is. Molecules always tend to want to “spread out” and occupy places where they’re not bunched together. This process helps in the marination process because the seasonings will diffuse into the interior flesh of the meat. The longer that rub or brine is exposed to the surface of the meat, the more diffusion or osmosis will take place. The more seasoning will penetrate deeper into the meat, and the entire piece of flesh will taste better than if it were just thrown on the smoker with a quick dusting of that rub or splash in the brine.
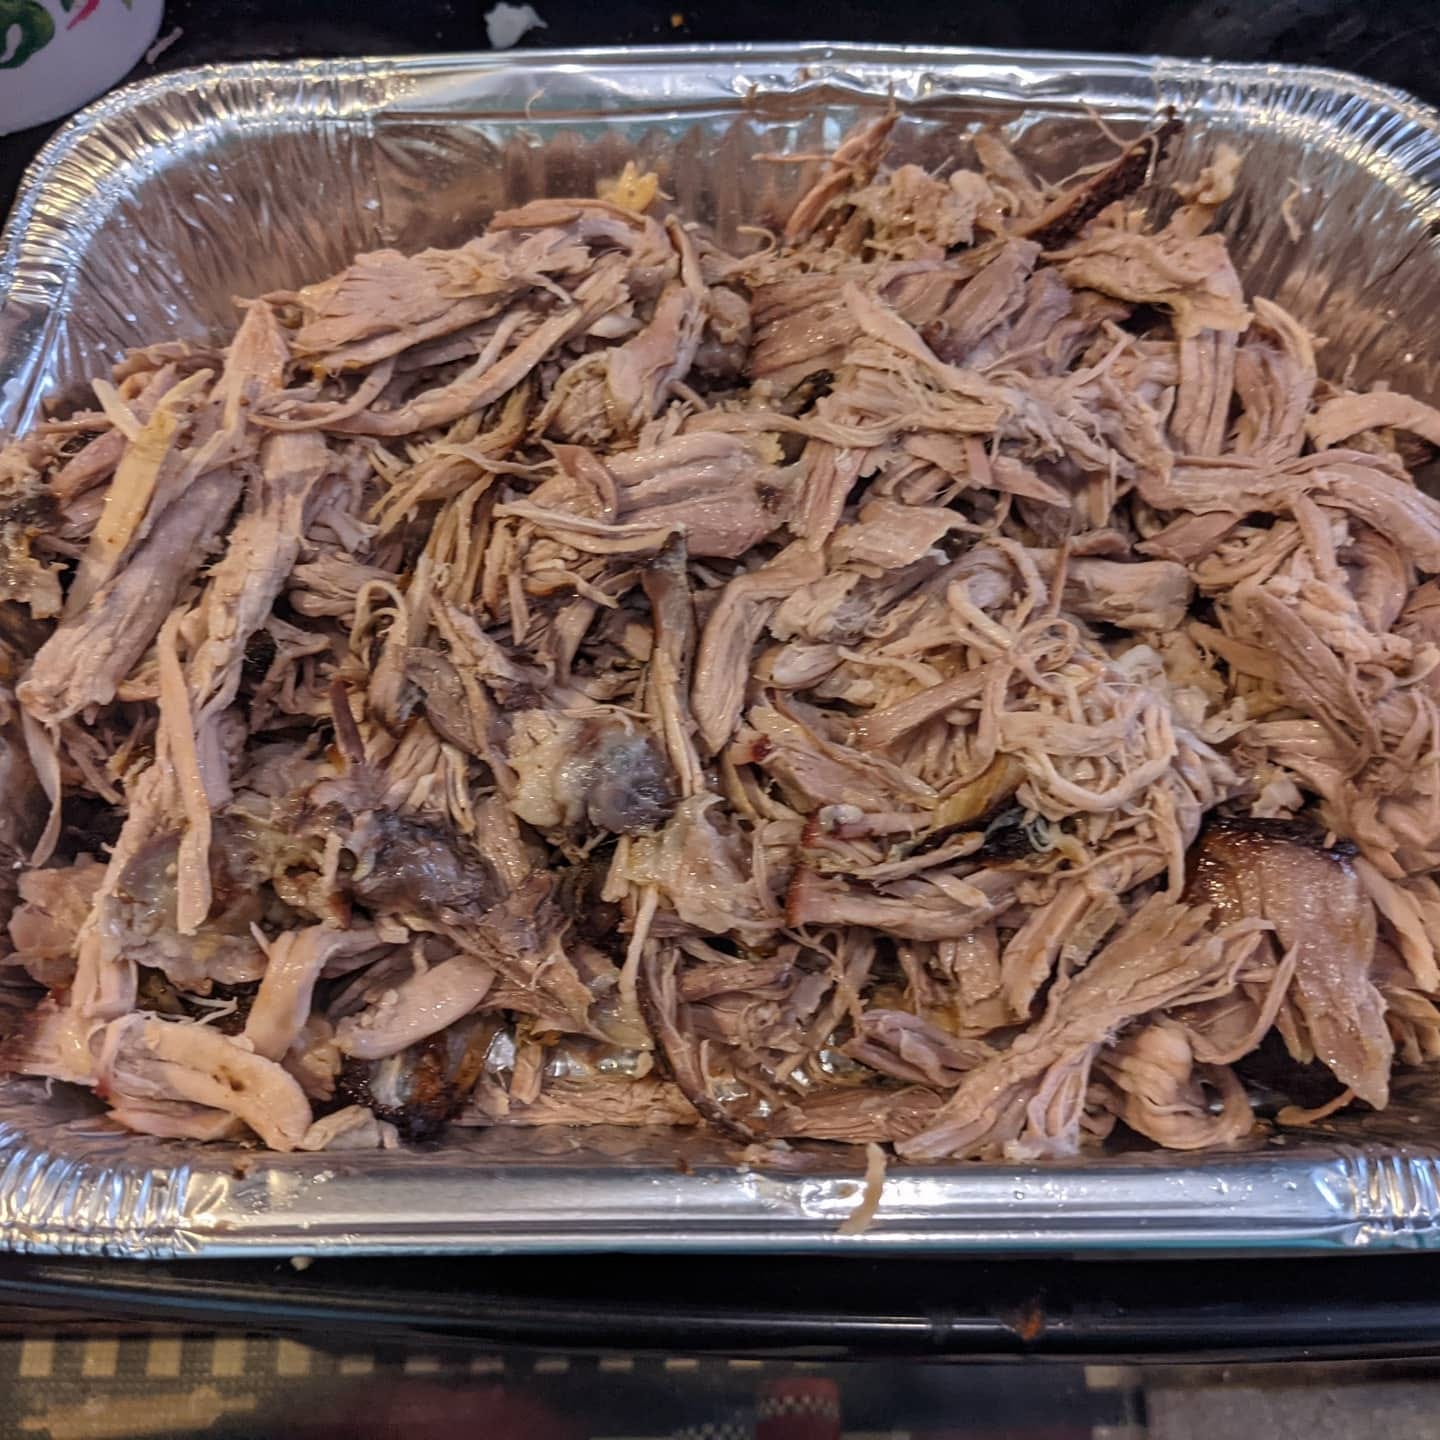
The question then becomes “how much dry rub should I use?” The answer is “enough to cover the entire surface of the piece of meat you’re smoking.” There are no exact measurements involved in this process. The dirty truth about any cooking process is that there’s a feeling out process, and no one really ever nails a dish the first time they make it. The real question is what proportion of spices are you going to use rather than measuring out each individual spice. The goal is to cover the entire piece of meat, not only to get the best coverage for permeating the surface of the meat, but for creating a surface crust known as bark. Not all of the spices on the surface will diffuse into the body. In fact, most of the rub will stay on the surface, and then that rub will caramelize and harden. That surface will have a jerky-like consistency, and it will, if you seasoned it right, will be a bomb of flavor. It might be too strong for some people, and that’s not a bad thing. Everyone’s palate is different. However, when the piece of meat is sliced or shredded, it will mix in with the more delicately flavored inside pieces.
So, the key for seasoning is to be liberal and to do it ahead of time. Overnight is good, and 24 hours is even better. So you’ve seasoned your hunk of meat, right? What do you do next? You have to cook it. Everyone has an opinion on what smoking medium you use, whether it be wood or charcoal (which is just lightly fossilized wood anyway). Do you use a strong wood like hickory or a mellow fruit wood like apple? Everyone’s got opinions about it, and there are guides about what wood goes best with what food you’re putting in the smoker. You do your research on this for yourself to see what flavors are best for your palate and the palates of those for whom you cook. Me, personally? I like using just a little bit of hickory along with a fruit wood for what I’ve smoked because it gives that slight bacony flavor without having to use bacon, which can be finicky as an ingredient whether on the grill or in the smoker.
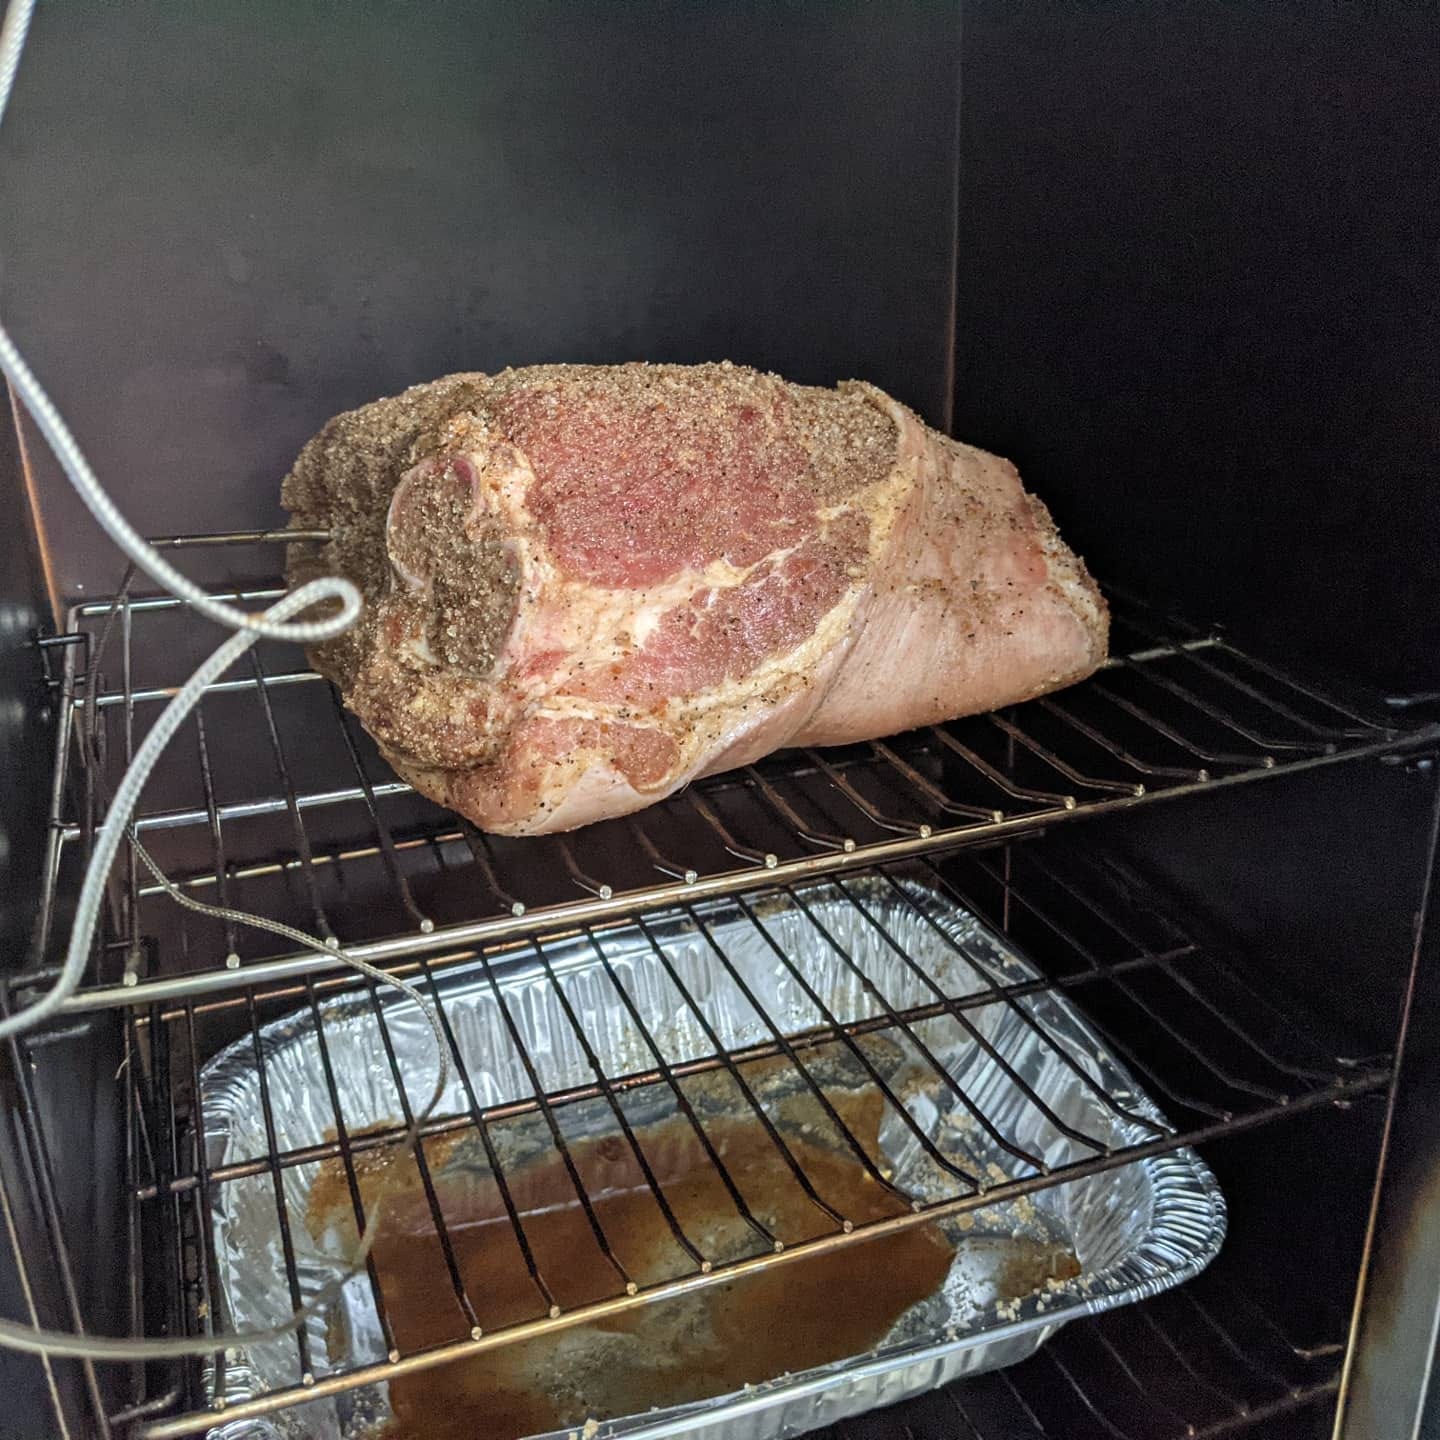
One indisputable fact, however, is that you do not cook by time, but rather by monitoring temperature. To be quite honest though, this is a good trick to use for any means of cooking, but using more direct methods of applying heat, you have other signs that will tell you how done your food is. Generally, if you grill, bake, sauté, you’re in constant visual contact with the food you’re cooking. You can see the color changes. You can gauge firmness either with your bare hands (if you have callouses) or with a utensil like a spatula. Using the smoker is different because you basically need to shut the door and forget about it for a couple of hours. Only a mammoth Thanksgiving turkey rivals the cook times needed to handle a hunk of meat barbecue style.
Every smoker, grill, Green Egg, thing named after Joe, whatever is different. They all hold heat differently. Even two smokers of the same model can have different hot zones or rates of heating and cooling. You may find suggested times or rates of cooking (90 minutes per pound), but they’re all rough guidelines. For example, a pork shoulder generally cooks to a desired temperature of between 197 and 202°F (don’t always use safe consumption temperatures, look up the desired range for each cut of meat you’re smoking) at a clip of between 90 and 120 minutes per pound. I smoked a seven-(or so)-pound shoulder this past Sunday, and it was done in a robust 7-and-a-half hours. I’m not sure whether the temperature gauge on the front of my unit was inaccurate (I aimed for between 225 and 250°F, but the thing about analog dial thermometers is they can get hella inaccurate hella quick) or whether I somehow had a perfect piece of meat that somehow surpassed The Dreaded Stall (aka, a phenomenon where the water inside a piece of meat evaporates, thus stunting the increase in temperature until all that water has evaporated). Either way, if I had stuck to a strict time-based smoke, I would have had a shoulder that disintegrated into pork dust.
You really have to monitor the temperature, and you can do that one of two ways. The first way by opening the smoker periodically and manually measuring the temperature with some kind of meat thermometer. This method will increase cook times because it will release heat from the smoker every time you open the door. I would suggest investing in a digital temperature probe, where you can jab the thickest piece of meat with a metallic probe that will keep constant tabs on whatever it is you’re cooking. The best ones are two-part wireless models where you have the probe and a handset. The two pieces communicate wirelessly, so you can go on playing video games or doing chores around the house or binging The Real Housewives of Sioux Falls if you so choose. You may still need to adjust your smoker if it doesn’t have digital temperature control. I have one with analog power control and ambient temperature monitoring, so I went out and checked like every 15-45 minutes to see if I needed to adjust the juice. However, the main thing is that you need to pay attention to the meat temperature above all else.

So, your brisket is at 195°F, your meatloaf is at 165°F, your pork shoulder at 202°F, or whatever. What’s next? The third and final beginner’s tip to faking like you know how to do BBQ is to let your meat rest longer than you would normally think to. Cooking any kind of meat should allow for a rest time after removing from the heat, because that’s the way you keep it juicy and tender. The “juice” of any meat is just rendered fat anyway. Fat is what makes anything luscious, unctuous, and gorgeous. The biggest mistake anyone makes is to cut into that piece of London broil right after taking it off the grill-top or carving that turkey right after you take it out of the oven. While direct, quicker methods of cooking generally require short rest periods, say between five and 15 minutes, I’ve found that longer rest times before shredding or slicing a barbecue meat is more conducive to that lush and fatty goodness you get when you sit down at Sweet Lucy’s, Dinosaur BBQ, or whatever your favorite joint is in the various lands where low-‘n-slow is religion. I’m not sure I’d go further than an hour, but as long as you keep your meat in a place that will help keep its latent heat like a cold oven, you won’t risk it becoming cold if you, say, plan on eating dinner at 5 PM but get done smoking your pork shoulder at, say, 1:30 PM.
To summarize the three beginner’s commandments of learning to get the hang of barbecue are:
- Season the piece of meat liberally and well ahead of time.
- Gauge doneness by temperature, not time.
- Allow the meat to rest longer than you would from a direct application of heat.
Granted, following these rules probably won’t preclude you from making mistakes. Even the best chefs, professional or amateur, make all kinds of mistakes in the kitchen. It’s normal. Unless you really fuck up, the worst thing that will happen is you will have an overseasoned or overcooked dish. All in all, you would still have something edible. But you will put yourself on the best path by following those guidelines. If you want to refine your technique and get really good at barbecuing, then what you should do, outside of practice obviously, is read books and articles about barbecuing, watch videos, listen to podcasts and interviews. Basically, you can’t execute if you don’t learn. Sure, there are some self-made, self-taught pitmasters out there, but more often than not, the community builds on itself, at least it does outside of the competition circuit. Remember what I said about that whole thing being cutthroat? Hoo boy. But just like you don’t have to be Michael Jordan to play pickup ball at the playground, you don’t need to be Ray Lampe to smoke some ribs. Will you be as good as Dr. BBQ himself when you try? Probably not, but you don’t have to enter a competition to make something worthy of eating. Make your friends and family happy. Make something you are satisfied with eating. You can only get there by learning more, and hopefully, my three hobbyist techniques will help you get to a level where you can take what tips the masters are willing to share so as not to give away any tips to their competition and incorporate them yourselves.
I've just started smoking this year myself. One tip I'd like to add, you don't need a smoker! You can do it on a standard grill. On my three burner I put a tray of water on one side under the grate and the meat above it. Use the other two burners to regulate temperature. Big Box hardware stores have metal "smoker boxes" to put wood chips in (directly above the flames), but you can use aluminum foil with some holes poked in it. You'll want two good thermometers, one for the meat and one for the grill temp. Don't trust the one built into the grill lid!